מדריך Windows Phone – פקדים בסיסיים: כפתורים
כפתור הוא פקד שניתן ללחוץ עליו. ישנם מספר סוגים שונים של פקדים שעונים על הגדרה זו ומה שמשותף להם הוא שלכולם יש אירוע Click.
הפקד Button
פקד הכפתור הכי בסיסי שיש, נקרא Button. פקד זה הוא הגרסה הכי פשוטה ומוכרת של כפתור. הפקד נראה כמו כפתור סטנדרטי של Windows Phone ומספק אירוע Click כאשר לוחצים עליו.
התכונה Content
התכונה Content מכילה את התוכן של הכפתור. לרוב נשים שם את הטקסט שנרצה שיופיע על הכפתור. ניתן לשים בתכונה זו אוסף של פקדים, כולל טקסטים תמונות ואפילו פקדים אחרים. על כך נדבר בפרק אחר בהמשך המדריך.
דוגמת קוד להצבת טקסט של כפתור:
<phone:PhoneApplicationPage
  x:Class="PhoneDemo.MainPage"
  >="http://schemas.microsoft.com/winfx/2006/xaml/presentation"
  >:x="http://schemas.microsoft.com/winfx/2006/xaml"
  >:phone="clr-namespace:Microsoft.Phone.Controls;assembly=Microsoft.Phone"
  >:d="http://schemas.microsoft.com/expression/blend/2008"
  >:mc="http://schemas.openxmlformats.org/markup-compatibility/2006"
  mc:Ignorable="d"
  d:DesignWidth="480"
  d:DesignHeight="800"
  FontFamily="{StaticResource PhoneFontFamilyNormal}"
  FontSize="{StaticResource PhoneFontSizeNormal}"
  Foreground="{StaticResource PhoneForegroundBrush}"
  Orientation="Portrait"
  SupportedOrientations="Portrait">
  <StackPanel>
    <Button
      Content="This is my button" />
  </StackPanel>
</phone:PhoneApplicationPage>

האירוע Click
האירוע Click הוא האירוע החשוב ביותר שיש לכפתור. אירוע זה נקרא כאשר מתבצעת לחיצה של המשתמש על הכפתור.
בתגובה לאירוע זה נכתוב את הקוד שנרצה שיתרחש כאשר הכפתור נלחץ.
בדוגמא הבאה נרשם לאירוע Click כך שידפיס הודעה למסך בעת לחיצה עליו. להלן קוד הXAML:
<phone:PhoneApplicationPage
  x:Class="PhoneDemo.MainPage"
  >="http://schemas.microsoft.com/winfx/2006/xaml/presentation"
  >:x="http://schemas.microsoft.com/winfx/2006/xaml"
  >:phone="clr-namespace:Microsoft.Phone.Controls;assembly=Microsoft.Phone"
  >:d="http://schemas.microsoft.com/expression/blend/2008"
  >:mc="http://schemas.openxmlformats.org/markup-compatibility/2006"
  mc:Ignorable="d"
  d:DesignWidth="480"
  d:DesignHeight="800"
  FontFamily="{StaticResource PhoneFontFamilyNormal}"
  FontSize="{StaticResource PhoneFontSizeNormal}"
  Foreground="{StaticResource PhoneForegroundBrush}"
  Orientation="Portrait"
  SupportedOrientations="Portrait">
  <StackPanel>
    <Button
      Content="This is my button"
      Click="Button_Click" />
  </StackPanel>
</phone:PhoneApplicationPage>
והקוד #C שמאחוריו:
using System.Windows;
using Microsoft.Phone.Controls;

namespace PhoneDemo
{
  public partial class MainPage : PhoneApplicationPage
  {
    // Constructor
    public MainPage()
    {
      InitializeComponent();
    }

    private void Button_Click(object sender, RoutedEventArgs e)
    {
      MessageBox.Show("Button was clicked");
    }
  }
}
הפקד RepeatButton
הפקד RepeatButton הוא כפתור בעל התכונה הבאה: כאשר לוחצים על הכפתור (ללא עזיבה) הוא יורה את האירוע Click, וכל עוד אנחנו לא משחררים את הכפתור הוא ממשיך לירות את האירוע Click שוב ושוב.
כפתור כזה שימושי במקרים מסויימים כאשר נרצה להמשיך להגיב ללחיצה כל עוד המשתמש לוחץ על הכפתור. לדוגמא, אם תתבוננו בהתנהגות של ScrollBar, אזי הכפתור חצים שמופיעים בו מתנהגים כמו RepeatButton מאחר וכל עוד אנו ממשיכים ללחוץ עליהם הגלילה נמשכת.
התכונה Interval
לפקד RepeatButton יש תכונה בשם Interval שקובעת כל כמה זמן האירוע Click יתבצע, בהנחה שהכפתור עדיין לחוץ. הערך של Interval נקבע במילישניות (אלפיות השנייה).
הקוד הבא יוצר RepeatButton שמפעיל את האירוע Click כל שנייה:
<phone:PhoneApplicationPage
  x:Class="PhoneDemo.MainPage"
  >="http://schemas.microsoft.com/winfx/2006/xaml/presentation"
  >:x="http://schemas.microsoft.com/winfx/2006/xaml"
  >:phone="clr-namespace:Microsoft.Phone.Controls;assembly=Microsoft.Phone"
  >:d="http://schemas.microsoft.com/expression/blend/2008"
  >:mc="http://schemas.openxmlformats.org/markup-compatibility/2006"
  mc:Ignorable="d"
  d:DesignWidth="480"
  d:DesignHeight="800"
  FontFamily="{StaticResource PhoneFontFamilyNormal}"
  FontSize="{StaticResource PhoneFontSizeNormal}"
  Foreground="{StaticResource PhoneForegroundBrush}"
  Orientation="Portrait"
  SupportedOrientations="Portrait">
  <StackPanel>
    <RepeatButton
      Content="repeat button"
      Interval="1000"
      Click="RepeatButton_Click" />
  </StackPanel>
</phone:PhoneApplicationPage>
הפקד CheckBox
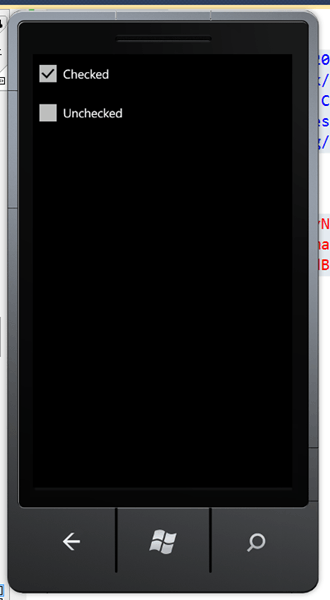
הפקד CheckBox הוא פקד בעל שני מצבים: מסומן ולא מסומן. התכונה IsChecked מאפשרת לקבוע את מצבו של הפקד.
הקוד הבא מציג פקד CheckBox בשני מצבים שונים:
<phone:PhoneApplicationPage
  x:Class="PhoneDemo.MainPage"
  >="http://schemas.microsoft.com/winfx/2006/xaml/presentation"
  >:x="http://schemas.microsoft.com/winfx/2006/xaml"
  >:phone="clr-namespace:Microsoft.Phone.Controls;assembly=Microsoft.Phone"
  >:d="http://schemas.microsoft.com/expression/blend/2008"
  >:mc="http://schemas.openxmlformats.org/markup-compatibility/2006"
  mc:Ignorable="d"
  d:DesignWidth="480"
  d:DesignHeight="800"
  FontFamily="{StaticResource PhoneFontFamilyNormal}"
  FontSize="{StaticResource PhoneFontSizeNormal}"
  Foreground="{StaticResource PhoneForegroundBrush}"
  Orientation="Portrait"
  SupportedOrientations="Portrait">
  <StackPanel>
    <CheckBox
      Content="Checked"
      IsChecked="True" />
    <CheckBox
      Content="Unchecked"
      IsChecked="False" />
  </StackPanel>
</phone:PhoneApplicationPage>

התכונה IsThreeStates
לפקד CheckBox יש גם אפשרות לעבוד עם 3 מצבים. כדי להדליק אפשרות זאת יש לסמן את התכונה IsThreeStates להיות True.
לדוגמא, הקוד הבא מדגים כיצד נראה פקד CheckBox שהדליקו לו את המצב השלישי, בשלושת המצבים:
<phone:PhoneApplicationPage
  x:Class="PhoneDemo.MainPage"
  >="http://schemas.microsoft.com/winfx/2006/xaml/presentation"
  >:x="http://schemas.microsoft.com/winfx/2006/xaml"
  >:phone="clr-namespace:Microsoft.Phone.Controls;assembly=Microsoft.Phone"
  >:d="http://schemas.microsoft.com/expression/blend/2008"
  >:mc="http://schemas.openxmlformats.org/markup-compatibility/2006"
  mc:Ignorable="d"
  d:DesignWidth="480"
  d:DesignHeight="800"
  FontFamily="{StaticResource PhoneFontFamilyNormal}"
  FontSize="{StaticResource PhoneFontSizeNormal}"
  Foreground="{StaticResource PhoneForegroundBrush}"
  Orientation="Portrait"
  SupportedOrientations="Portrait">
  <StackPanel>
    <CheckBox
      Content="Checked"
      IsChecked="True"
      IsThreeState="True" />
    <CheckBox
      Content="Unchecked"
      IsChecked="True"
      IsThreeState="True" />
    <CheckBox
      Content="Intermediate"
      IsChecked="{x:Null}"
      IsThreeState="True" />
  </StackPanel>
</phone:PhoneApplicationPage>

אירועים נוספים של CheckBox
לפקד CheckBox יש מספר אירועים נוספים מלבד אירוע Click. האירועים הם Checked, Indeterminate ו Unchecked. אירועים אלו יופעלו כאשר הפקד יעבור למצב המתאים.
הפקד RadioButton
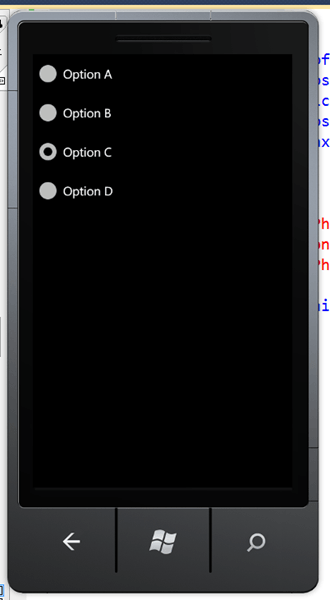
הפקד RadioButton נועד לאפשר למשתמש לבחור מבין מספר אפשרויות שונות. לכל אפשרות ניצור כפתור RadioButton נוסף. הדרך להדליק את האפשרות היא ע"י שימוש בתכונה IsChecked כמו עבור CheckBox.
לדוגמא הקוד הבא נותן למשתמש לבחור מבין ארבעה אפשרויות שונות, כאשר האפשרות השלישית היא הנבחרת ברגע הטעינה:
<phone:PhoneApplicationPage
  x:Class="PhoneDemo.MainPage"
  >="http://schemas.microsoft.com/winfx/2006/xaml/presentation"
  >:x="http://schemas.microsoft.com/winfx/2006/xaml"
  >:phone="clr-namespace:Microsoft.Phone.Controls;assembly=Microsoft.Phone"
  >:d="http://schemas.microsoft.com/expression/blend/2008"
  >:mc="http://schemas.openxmlformats.org/markup-compatibility/2006"
  mc:Ignorable="d"
  d:DesignWidth="480"
  d:DesignHeight="800"
  FontFamily="{StaticResource PhoneFontFamilyNormal}"
  FontSize="{StaticResource PhoneFontSizeNormal}"
  Foreground="{StaticResource PhoneForegroundBrush}"
  Orientation="Portrait"
  SupportedOrientations="Portrait">
  <StackPanel>
    <RadioButton
      Content="Option A" />
    <RadioButton
      Content="Option B" />
    <RadioButton
      Content="Option C"
      IsChecked="True" />
    <RadioButton
      Content="Option D" />
  </StackPanel>
</phone:PhoneApplicationPage>

נעיר כי בכל רגע נתון ניתן לבחור רק אפשרות אחת לכל היותר מבין האפשרויות המצויות בקבוצה של פקדי RadioButton. אם עולה הצורך לתת שתי קבוצות שונות של RadioButton שבכל קבוצה ניתן לבחור אפשרות אחת לכל היותר אז יש לקבוע את התכונה GroupName של כל קבוצה בנפרד להיות אותו דבר.
לדוגמא:
<phone:PhoneApplicationPage
  x:Class="PhoneDemo.MainPage"
  >="http://schemas.microsoft.com/winfx/2006/xaml/presentation"
  >:x="http://schemas.microsoft.com/winfx/2006/xaml"
  >:phone="clr-namespace:Microsoft.Phone.Controls;assembly=Microsoft.Phone"
  >:d="http://schemas.microsoft.com/expression/blend/2008"
  >:mc="http://schemas.openxmlformats.org/markup-compatibility/2006"
  mc:Ignorable="d"
  d:DesignWidth="480"
  d:DesignHeight="800"
  FontFamily="{StaticResource PhoneFontFamilyNormal}"
  FontSize="{StaticResource PhoneFontSizeNormal}"
  Foreground="{StaticResource PhoneForegroundBrush}"
  Orientation="Portrait"
  SupportedOrientations="Portrait">
  <StackPanel>
    <RadioButton
      GroupName="GroupA"
      Content="Option A" />
    <RadioButton
      GroupName="GroupA"
      Content="Option B" />
    <RadioButton
      GroupName="GroupA"
      Content="Option C"
      IsChecked="True" />
    <RadioButton
      GroupName="GroupA"
      Content="Option D" />
    <RadioButton
      GroupName="GroupB"
      Content="Different group A" />
    <RadioButton
      GroupName="GroupB"
      Content="Different group B"
      IsChecked="True" />
  </StackPanel>
</phone:PhoneApplicationPage>


תגובות בפייסבוק